Saturday, June 30, 2012

Food Network Monthly Cookalong June Wrap Up

I guess you can tell already that I am enjoying the Food Network Monthly Cookalong! I absolutely love Eat Street and it is one of the Food Network shows that you can always find on my DVR. It is amazing to me the different types of food people are making out there in the back of a truck! \

Here are the links to the participating blogs. Everything looks amazing and there has definitely been some vegan innovation!

Megan blogging at The Vegan Cookbook Aficionado finally got her hands on some canned jackfruit and made some magic happen! She veganized Thai Pork Tacos from Camille's On Wheels and they look delicious! http://cookbookaficionado.wordpress.com/2012/06/28/food-network-monthly-cookalong-thai-pulled-pork-tacos/


Melissa at Loves To Eat Vegan! decided now was a great time to join in on the cookalong fun and boy am I glad she did! Melissa first veganized the Cheesy Mac 'n Rib from the Grilled Cheese Truck and she too used canned jackfruit! I think someone should start buying shares in jackfruit! Vegans are crazy about it! This recipe is no joke either, Melissa went all out with pulled BBQ jackfruit, mac 'n cheese, caramelized onions and sliced Daiya Havarti (lucky you Melissa!) http://lovestoeatvegan.blogspot.ca/2012/06/food-network-monthly-cookalong-grilled.html


She then went on to imagine what she would make if she owned her own grilled cheese truck and with a little motivation from a contest winning sandwich, she created something awe-inspiring! It has Smoky Curls from Vegan Diner which are my absolute favourite soy curl, vegan cream cheese, Daiya shreds and a Blackberry Jalapeno Jam! Now that is a sandwich! http://lovestoeatvegan.blogspot.ca/2012/06/food-network-monthly-cookalong-my.html


Tami (the Food Network Cookalong originator) went for some local inspiration and veganized Dim and Den Sum's Soba Noodles which are the opposite of what you would usually expect from a food truck with no sign of a deep fryer and sauted fresh greens! Then she found a childhood favourite in Nosh Box's Cleveland Fried Bologna Sandwich where she easily swapped out that mystery meat for Tofurky's new bologna slices. 


I knew Liz would be in for this month's theme since she had been tweeting up a storm from Vietnam bragging about all the delicious street food she had been eating! I was happy she shared her take on the Banh Mi sandwich since she has tasted the real deal. She went open faced and stresses you have to find some sambal oelek to make it just right! http://cookingtheveganbooks.com/2012/06/09/food-network-monthly-cookalong-banh-mi/


My Cookalong Posts for quick navigation

Truitbe to Seabirds - Jackfruit Carnita Taquitos http://threeandahalfvegans.blogspot.ca/2012/06/food-network-monthly-cookalong-my.html

Tribute to Native Bowl - Mississippi Bowl http://threeandahalfvegans.blogspot.ca/2012/06/food-network-monthly-cookalong-my_11.html

Ice Cream - Drumstick Sugar Cone http://threeandahalfvegans.blogspot.ca/2012/06/food-network-monthly-cookalong-if-i-had.html

Ice Cream - Sweet Curry Choco-Coconut http://threeandahalfvegans.blogspot.ca/2012/06/food-network-monthly-if-i-had-ice-cream.html

Pierogi - Cheeseburger http://threeandahalfvegans.blogspot.ca/2012/06/food-network-monthly-cookalong-perogi.html

Pierogi - Shepherd's Pie http://threeandahalfvegans.blogspot.ca/2012/06/food-network-monthly-cookalong-pierogi.html

Pierogi - Poutine http://threeandahalfvegans.blogspot.ca/2012/06/food-network-monthly-cookalong-pierogi_26.html

Pierogi - Apple Strudel http://threeandahalfvegans.blogspot.ca/2012/06/food-network-monthly-cookalong-pierogi_27.html

I Can't Say it's a Beaver Tail http://threeandahalfvegans.blogspot.ca/2012/06/food-network-monthly-cookalong-i-cant.html

Please note: I am posting photos with each link so you can see the beautiful creations these people put together. The photos are the property of each blogger and shouldn't be copied and used unless you have their consent. I'm sure they won't mind you sharing with friends just be nice and give credit where credit is due.

June Vegan Food Swap Part 2

Next I am going to share all the goodies I received from Kimmi over at KimmiKillZombie! First I have to say, I am in love with her new pink hair. I love bright bold colours in hair but I am much too much of a chicken to actually do it. Maybe some day, never know! Any ways, Kimmi and I were paired with each other so I sent goodies to her and she sent some to me. Here's a look at all the awesome stuff I received!


Here's the whole she-bang as they say...no...no one says that except me, alright!


A bar of Olive and Aloe Kiss My Face Soap that smells soooooo good!


A jar of Red Currant Jam which I can tell you is excellent for breakfast on toast!

Sahale Snacks Soledad Almonds - These are so yummy. They are a little spicy, a little sweet, nutty and addictive!


A couple Yummy Earth lollipops...also claimed in the name of Mac!

A bag of Sun-Rype Fruit Source Mini Bites. We have the fruit leather-y strips all the time around here but we hadn't tried these. They are so tasty and almost gummi candy like which is a super score in my books!


A bag of YogaVive Popped Apple Chips - they are like dried apples but crisper. Mac is a big fan of these!


There was also a couple of Mrs. May's Trio Bars but my picture was really horrible and they may already be gone...just maybe! Kimmi also sent the cutest illustrated note along with my goodies!

Thanks again to Kimmi for all the delicious treats! I definitely enjoyed them all. Again if you are interested in participating next month in the Canadian Edition of the Vegan Food Swap, click here for more information!

Friday, June 29, 2012

June Vegan Food Swap Part 1

It's that time again! Time to brag share with you what I got in my latest Vegan Food Swap parcel! This month, Me'shell sent out a FB message looking for someone to take on a second partner and I quickly accepted since that meant two times the shopping for goodies!! My extra partner was Gabby who blogs from The Veggie Nook. You should go check out her blog too, she has an especially yummy looking tofu scramble recipe up and many more too! Gabby sent me so many yummy treats! The big hit was the bag of gluten free pretzels in my son's opinion. We have these on hand all the time but as soon as he saw the little bag as I was opening up the parcel he grabbed it and ran off!

Here's the photos and play by play of what Gabby sent!


Here's the whole box before I started unpacking it...


A quick picture of the delicious gluten free pretzels before Mac claimed them as his own.


A bag of Cocoa Kissed Savi Seeds...there not nuts but they do taste like them! Delicious treat and a great source of Omega 3.


A bag of Chocolate Coconut Almonds from Q's Nuts that I am still saving for a rainy day chocolate craving!


A package of Eco Chefs Red Lentil Fusilli


A juice box of Vita Coco Coconut water which I had never tried before. I ended up making it into a Pink Lemonade Coconut Water Frosty on one of the days last week that hit 42C with the humidex. We were in need of some hydration for sure!


And a selection of Gabby's favourite teas, a Cherry Lara Bar (one of my very favourites), a small package of chia seeds and a few packets of stevia. Gabby is doing a sugar free challenge on her blog right now so I can see why she would send me some Stevia! 

Thanks again to Gabby for the wonderful parcel of goodies!! And to Me'Shell for hosting our Vegan Food Swap as well. If you live in Canada and would like to participate next month, check out Me'Shell's blog for all the details and sign up sheet. It is a lot of fun! Stay tuned for another post soon about my other partner from this months' swap!

Thursday, June 28, 2012

Food Network Monthly Cookalong: I can't say it's a Beaver Tail

Here in Ottawa, there aren't many food trucks. Most of the trucks around here are chip wagons. They sell fries, the infamous poutine, pogos, etc. There are a few exceptions to this of course and one of those exceptions are Beaver Tails. I know it doesn't sound appetizing and definitely not vegan but I promise you they are delicious and worth the effort to make your own at home when you feel like something delicious. Most people in Ottawa will have memories of skating along the Canal and grabbing a Beaver Tail along the way. President Obama also made quite a stir when he stopped by their Market location to try one. They are basically a whole wheat fried pastry shaped like a beaver's tail that is topped with butter and then various toppings. It is like a distant cousin of a donut. It is slightly crisp on the outside but tender on the inside. My favourite flavour was always the Killaloe Sunrise which had the Beaver Tail sprinkled generously with sugar and then served with a wedge of lemon to squeeze over the top. I actually remember when I was a teenager that I would be craving a Beaver Tail in the middle of the summer (in my day you had to wait for the Canal to open for skating, now they have a year round location) and I would make a piece of toast and add sugar and lemon juice. Ryan's go-to was the more simple Cinnamon Sugar. They have gotten much more adventurous with their toppings now but for our treat we kept it simple and went with these two that we had always enjoyed.

Here's my take on a Beaver Tail, top it as you wish!

I Can't Say It's A Beaver Tail

3 cups whole wheat flour
1 cup all-purpose flour
1/4 cup light brown sugar
1/2 tsp salt
1/4 cup vegan margarine, melted (I used Vegan Becel)
1 1/2 cups warm water
1 tsp instant yeast

Oil for frying (I used sunflower)

For Serving

Vegan margarine to spread on cooked pastries
Cinnamon Sugar
Granulated Sugar and Lemon Wedges

1. Combine all the ingredients in a large bowl or plastic bucket (that's what I used). Add a bit more flour or water if needed. I kneaded the dough just for a minute or two. It will be slightly tacky but not sticky.

2. Cover with plastic wrap or lid and let sit in a warm place for 2 hours. Once risen you can shape and fry immediately or place in the fridge to use later. (I put mine in the fridge overnight and shaped it while cold from the fridge and it still worked perfectly)

3. When you are ready to fry, you will have to find the widest yet still deep pot you have. I couldn't make them as long as they do so you can always just make them smaller and use a smaller pot. Heat the oil until it shimmers (and if you put a small piece of dough in the oil it bubbles around the edges and floats immediately to the top). Quickly cut off a 2" ball of dough and stretch into a long oblong shape. You want the middle to be thin like you are almost about to rip it but don't and it should be a bit thicker around the edges. Gently slide into the hot oil. Turn after about a minute to cook the other side as well. Once it is lightly golden brown on both sides remove and drain on a cooling rack lined with paper towel.

4. Butter one side with vegan margarine and either sprinkle with cinnamon sugar or just plain sugar and then squeeze with a wedge of lemon. Enjoy them while they are warm!


Wednesday, June 27, 2012

Food Network Monthly Cookalong: Pierogi Truck Dreams (Part 4)

One last pierogi and I promise it is worth the wait! After all those savoury pierogi, I'm sure you will be craving something a little sweet. How about Apple Strudel in pierogi form? Yeah, that's what I thought too...SUPER YUM! It seems like a match made in heaven and while rolling out pierogi dough is tough and takes awhile, it doesn't compare to trying to roll out some strudel dough the size of your kitchen table. In this one, I used traditional flavours but stuffed them in the same pierogi dough I used for the rest (and yes, I mean the dough from the Potato Pierogi from Vegan Brunch) then fried them just like the others and served them dusted with powdered sugar and a drizzle of caramel sauce. What happened after I took the photo? Home made vanilla ice cream is what happened and I highly recommend adding it the warm strudel pierogi when you are serving. The heat from the strudel melts the ice cream just slightly and the caramel adds just a little more richness and sweetness. Is this dessert a low calorie, everyday treat? Heck no! But it is something you should treat yourself to sometime when you feel like a little decadence.

Apple Strudel Pierogi

Filling

4 small apples, peeled and diced small (I used Gala)
1 tbsp lemon juice
1/2 cup turbinado sugar
1/2 cup walnuts, chopped small
1 tsp cinnamon
scant 1/4 tsp nutmeg
1/8 tsp cloves
1/2 cup bread crumbs (I toasted some whole wheat sandwich bread and then used a spice grinder to make the crumbs)
zest of 1/2 an orange (preferably organic since you are eating the skin and don't forget to wash it!)

To Serve
Powdered Sugar to dust
Vanilla Ice Cream
Caramel Sauce

1. In a medium sized bowl combine all the filling ingredients. Let sit for about a half an hour to let all the flavours mingle.

2. Using your prepared dough circles, start filling each with about a tablespoon of the filling making sure to scrape up the side of the bowl and leave behind most of the liquid. I found it easier to hold the dough circle in my hand and kind of cup it when filling these as opposed to on the table in front of me. Place them on a baking sheet lined with floured wax paper and when you are finished, place them in the freezer for about two hours (more is fine) to make it easier to handle when you are cooking them.

3. To cook the pierogi, follow instructions from previous Cheeseburger Pierogi post (steps 4 and 5).

4. To serve, place a few pierogi in a bowl (or a basket like we did) and then sprinkle with powdered sugar. To go even further into Yummy-Town, serve with a scoop of vanilla ice cream and caramel sauce drizzle.

Makes enough to fill 21 pierogi


Tuesday, June 26, 2012

Food Network Monthly Cookalong: Pierogi Truck Dreams (Part 3)

This one is so simple, I feel bad calling it a recipe but I really feel you need to try it out! It's more of a delicious combination than a recipe. Poutine is a big deal where I live. We are very close to Quebec where it has it's roots and you can find it on just about every (I might dare to say all) chip trucks here in Ottawa which are the most popular kind of food trucks here. I honestly had never heard of it until I moved to Ottawa though I hear it has reached Newfoundland now with versions of Newtine with stuffing and peas on fries being created.

I haven't had poutine in a long time...probably about two years since that's how long I've been vegan. I decided to give Daiya mozzarella shreds a try on top of Potato Pierogi covered in the gravy from the Shepherd's Pie pierogi I posted yesterday and oh my...what a treat! I went easy on the Daiya (as you can see from the picture) because I have only just started to like it and find it works best if you use the less is more approach. It tasted just as yummy as I remember poutine tasting, still getting that creaminess from the melted cheese and full of umami flavour from the gravy. I always liked mine with a little ketchup which went on right after taking this photo. Definitely not traditional but hey none of this really is, now is it?

So to really lay it out...make and cook some Potato Pierogi (still from Vegan Brunch, cooked using the same method as the others), place them on a plate (or in a basket like we did) and then sprinkle on a bit of mozzarella Daiya, cover that with hot gravy (from yesterday's post of Shepherd's Pie pierogi) so it will melt the Daiya and enjoy!


Monday, June 25, 2012

Food Network Monthly Cookalong: Pierogi Trucks Dreams (Part 2)

This next one seemed to immediately lend itself to pierogi form considering our usual ones are filling with mashed potatoes. I decided the best way to mix the "meaty" filling and mashed potato was to serve a few of each together smothered in gravy. I mean what doesn't taste great smothered in gravy right?! So to make these ones, you will have to make a batch of Isa's Potato Pierogi from Vegan Brunch and mix and match with these. We always have a few bags of them in the freezer, you should too, they make excellent quick suppers this way.

Shepherd's Pie Pierogi

Filling
1 tbsp olive oil
1 large carrot, peeled and finely diced
1 large onion, finely diced
1/2 lb frozen vegetarian ground crumbles (I used PC Blue Menu brand but Gardein would work as well)
1 cup beefy broth
1 tbsp reduced sodium tamari
Capful of Kitchen Bouquet (optional, just for colour really)
1/4 cup frozen peas
Salt and Pepper to taste

Gravy
2 med-large onions, diced
1/4 cup olive oil
1/4 cup all purpose flour
4 cups beefy broth
1 clove garlic, minced
2 tsp yellow miso
1 tbsp nutritional yeast
1 tsp Kitchen Bouquet (optional, again just for colour)
1 tsp reduced sodium tamari
Pinch dried thyme
Salt and Pepper to taste

1. Using a large saute pan over medium-high heat, warm the olive oil then add in the carrot, onion and vegetarian crumbles. Pan fry it, stirring occasionally until the onions are softened and starting to caramelize just a bit. Add in the broth, tamari, Kitchen Bouquet (if using) and frozen peas. Continue to cook, reducing down the broth until there is little broth/liquid left. Remove from heat, taste and add salt and pepper to taste. Let cool before filling the pierogi and again I froze these for about two hours before cooking.

2. Make the gravy while they are freezing. Start with a heavy bottomed sauce pan over medium high heat. Add the onions and olive oil and saute the onions until they are starting to caramelize since that's where the flavour is going to come from. Once caramelized, add in the flour and stir with a wooden spoon. You want to make a roux, so you will cook the flour in the oil until it is starting to turn light golden brown. Keep stirring it so it doesn't burn in places. Switch to a wire whisk and slowly pour in the beefy broth while constantly whisking. Continue to whisk and add in the garlic, miso, nutritional yeast, Kitchen Bouquet (if using), tamari and dried thyme. Cook until thickened to your liking. Carefully taste and add salt and pepper to taste. Keep warm while you cook the pierogi, occasionally stirring to avoid a skin forming on top.

3. To cook the pierogi, follow instructions from previous Cheeseburger Pierogi post (steps 4 and 5).

4. To serve, place a few Shepherd's Pie pierogi and a few Potato Pierogi on a plate (or in a basket like we did) and smother in warm gravy!

Makes enough to fill 21 pierogi


Sunday, June 24, 2012

Food Network Monthly Cookalong: Perogi Truck Dreams (Part 1)

I've seen a few pierogi food trucks on Eat Street and I gotta say...I have no clue how they make pierogi into fast food! It is a labour of love that always takes me a full day and I only make about 120 when I do a big batch. I'm guessing the secret lies in a dough sheeter or maybe some magic or maybe they have someone's grammie hiding in the back mass producing them. I swear I remember one truck saying she served over a 1000 some days!

I loved pierogi before I was vegan but never would have considered making them myself until I realized it wasn't easy to find a vegan version commercially. I'm so glad I found a recipe in Vegan Brunch and decided to take the time to learn how to make them. I think I enjoy them more now knowing the effort I put into them and I love that I can customize the fillings. After seeing a few food trucks do them, I started to think about what kind of pierogi I would want to make if I were on a food truck. Ryan and I had a brainstorming session and came up with tons of ideas but the ones that stood out were Cheeseburger, Shepherd's Pie, Poutine and Apple Strudel. I decided Father's Day would be a perfect date to try them out. We would have a pierogi feast! I have to say on the other end of the whole thing that maybe I should have been a little less ambitious but it was all worth it once I tasted them and heard the mmms around the table!

For the dough, I use Isa's recipe from Vegan Brunch with the only change being that I use olive oil in place of  the canola oil. Not because I think it's better, just that I buy big ol' bottles of olive oil at Costco so I always have lots on hand. Once you have made your dough, rolled it out and cut the circles you can stuff them with these tasty new fillings! Just because of the length each recipe will take I will be making four separate posts, one for each recipe. (The cooking method for the pierogi is always going to be the same so I will just refer to Step 3 and 4 from this post in the other recipes.)


Cheeseburger Pierogi

Filling
1 tbsp olive oil
1/2 lb frozen vegetarian ground crumbles (I used PC Blue Menu brand but Gardein would work as well)
1 small onion, finely diced
1/4 cup beefy broth 
1 tbsp reduced sodium tamari
3 tbsp dill pickle, finely diced
1/4 cup cheese sauce (use your favourite and make extra to top them with, I recommend the cheese sauce from Hearty Vegan for the Irish Nachos)
Salt and Pepper to taste
Olive Oil for frying

To Top Them
Ketchup 
Mustard
Burger Sauce (Vegenaise mixed with a small bit of ketchup, mustard, chopped dill pickle and some pickle juice from the jar)
Cheese Sauce (again use your favourite still recommending the one from Hearty Vegan)
Finely Diced Dill Pickles 

1. Using a large saute pan over high heat, warm the olive oil and then add in the frozen crumbles and onion. Pan fry it, stirring occasionally until the onion is slightly softened. Add in the beefy broth and tamari and continue to cook, letting the broth reduce until there is almost none left.

2. Remove from heat and stir in the pickles and cheese sauce. Taste and add salt and pepper if you feel it needs it.  Let cool, then fill pierogi. After filling and shaping, I froze them for about two hours which made them easier to handle for the cooking process.

3. To cook, bring a large pot of water to boil. Place a few pierogi in the pot and boil for just a few minutes. You want them to float. Remove them from the water and place on paper towel just to remove the water on the outside but don't leave them too long or the paper towel will start to stick. Once dried, place them on a sheet pan that is either lined with parchment/wax paper or lightly oiled.

4. After you have boiled all the pierogi, get a deep saute pan and pour in olive oil until you have about two inches in the pan leaving more than two inches of pan above the oil. This is a food truck dish so we are going to deep fry (click here for deep frying tips) these suckers! Heat the oil until it shimmers. Fry them in batches of four or five, being careful not to overcrowd the pan. Flip them after about thirty seconds or so and cook until the outside is bubbly and light in colour on both sides. My mom and I argue over this, she likes them really browned, I like them lighter, the choice is yours. It should only take a few minutes to fully cook them. Remove from the oil and place on a paper towel lined baking sheet. Keep them in a 200F oven to keep them warm while you fry the rest.

5. To serve: Place a few pierogi down on the plate (or basket like we used), smother in your favourite cheesy sauce, squirt a few lines of ketchup and mustard over the top, sprinkle the top with finely diced dill pickles and serve the burger sauce on the side for dipping!

Makes enough to fill 18 pierogi


Monday, June 18, 2012

Food Network Monthly: If I had an ice cream truck part two

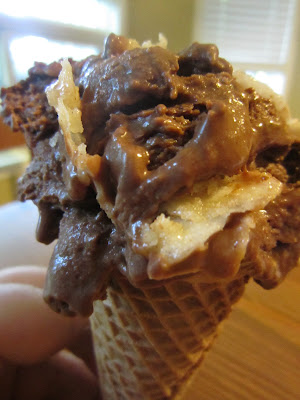
So I can honestly say that the Drumstick Sugar Cone Ice Cream was a serious hit around here! My in-laws happily finished off what we had restrained ourselves from eating and my father-in-law said it was the best one ever!

Coming up with that flavour got me thinking about what other flavours of ice cream I would have if I had an ice cream truck. I thought about interesting flavour combinations I have had over the years and the first one that popped up was a memory of a truffle from Vosges chocolatier that I absolutely adored pre-vegan. I even had them as the favour at our wedding! The truffle is called Naga and it is a combination of deep milk chocolate, coconut and sweet curry powder. I have made truffles before with semi-sweet and dark chocolate and they are a little too deep for this flavour combo but I know from making chocolate ice cream that the flavour becomes much milkier by adding non-dairy milk and silken tofu so I knew that was the way to recreate the flavours I had enjoyed before. The next stumbling block was that I had no idea what sweet curry powder meant. I googled and came up with a few companies that in fact sell a sweet curry blend but I wanted to eat that ice cream now and didn't have the patience to wait for something to arrive in the mail! I decided that I would make my own sweet curry blend. I thought through what spices would be tasty in this recipe and settled on a nice mix of cumin, coriander, ginger, garam masala, fenugreek, amchur powder (dried green mango) and anise. I also added in some candied coconut flakes spiked with the sweet curry powder for good measure. I have become quite addicted to the candied coconut so in the recipe I made lots and you can thank me later. If you eat a bit of it at a time it tastes almost like the coconut wheels in the liquorice allsorts which were always my favourites. I should also say the base of all my recipes is always inspired by Carla Kelly's vanilla ice cream recipe. She found the magic formula and I just keep running with it.


Sweet Curry Choco-Coconut Ice Cream

Ice Cream Base
1 1/2 cups So Delicious Vanilla Coconut Milk
6 oz silken tofu (not the boxed stuff, the refrigerated one in water)
3/4 cup icing sugar
3/4 cup granulated sugar
2/3 cup vegetable oil (I used grapeseed)
1 1/2 cups semi-sweet chocolate chips
1 tsp vanilla
1 tsp sweet curry powder (recipe follows)

Candied Coconut Flakes
1 cup granulated sugar
1/4 cup water
1 tsp sweet curry powder
1/2 tsp vanilla
1 1/2 cups unsweetened coconut flakes (the big shards of it)

Sweet Curry Powder
1 1/2 tsp ground ginger
1 tsp ground cumin
1 tsp ground coriander
1 tsp garam masala
1 tsp anise seeds
1/2 tsp fenugreek seeds 
1/2 tsp amchur powder

1. Start by making the sweet curry powder since you will need it to make the other two. Place all the spices in a spice grinder to grind the two seeds as well as mix the spices all together. Set aside and you will have extra leftover after making the ice cream.

2. Make the ice cream base: Place the chocolate chips in a microwave safe bowl and pour the vegetable oil on top. Microwave on high for one minute (checking after 30 seconds since it might be done, microwaves vary) until the oil is warm and the chips are melting. Stir this until it is well mixed. Combine all the ice cream base ingredients in a blender and blend until it is well emulsified and is thick almost like pudding. Chill and process in your ice cream maker according to the manufacturer's instructions.

3. While the ice cream is churning, prepare the candied coconut. First preheat the oven to 350F. Prepare a large rimmed sheet pan with a piece of parchment paper and set aside. Place the sugar, water, sweet curry powder and vanilla in a heavy bottomed sauce pan over medium-high heat. Stir with a wooden spoon or heat safe rubber spatula until the sugar has fully dissolved.  After about a minute or two the sugar will have dissolved and started to caramelize just slightly. Add in the coconut flakes and stir to coat them. Continue to cook while stirring for one more minute. Pour the coconut out (and any liquid left in the pot) onto the prepared sheet pan. Place in the oven for 5 minutes then stir/flip it and place back for 5 more minutes. You want it to be slightly browned. Once browned remove from the oven and let cool. It will crystallize and harden a bit as it cools and then you can break it up with your hands into smaller pieces. 

4. To finish the ice cream: Once your ice cream is finished churning, place in a freezer safe container and as you do sprinkle in pieces of the candied coconut. How much you add is up to you but you want to add enough that you will get a bit in each scoop (around 1/4-1/2 cup). Place in the freezer to let it really freeze and serve on a sugar cone once it has!


Thursday, June 14, 2012

Oh what a beautiful morning!

I'll be honest, life has been handing us some crappy turns lately but I am trying to not to focus on them too much. Sometimes all it takes to cheer me up is my son Mac singing a silly song in the morning or a scoop of delicious ice cream or maybe a cute picture of a sanctuary goat (click for cute goat picture). Sometimes it's finding something you have been looking for and something you didn't even know existed. Today that's what is making my day! I went out this morning to check out a local South Asian grocery store for my (second) Vegan Food Swap pal and when I walked in I saw the back wall was crowded with pots, pans and serving dishes. I searched through it all to find one perfect tiffin and four stainless steel divided plates. My husband was laughing at my gleeful reaction (I was dancing in the aisles) and I'm sure the owner of the store thought I was nutters too but I had been dreaming about having those divided plates for so long and now they are mine! I absolutely adore my tiffin too! I was discussing with someone on Twitter recently where would be a good place to find one and suggested to him that an Indian grocery would probably have them and there it was. It's quite sturdy and to me, nicely priced at $16.99. Now I just need somewhere to go for lunch so I can use it!


Then we headed off to Rainbow Foods to stock up on all things vegan and while searching through the many flours I spotted two new bags my eyes had never scanned before.


This new brand is One Degree Foods and they make Veganic (absolutely no animal by-products are used in the production of it, so that means there's no poop in the fertilizer) breads, seeds and flours. I had found the bread last time we were at Rainbow and we tried the Ancient Whole Wheat. It was tasty, soft and made with just five ingredients! Sadly they were sold out of the bread by the time we went back but I did score a bag of Organic Sprouted Spelt Flour and Organic Sprouted Whole Wheat Flour so I can make my own at home. And yes, I realized how amazingly hippy granola I have become when I was shrieking in the aisles of the health food store over flour. I can't even explain how exciting it is to see something that says Veganic on it and I hope this catches on and really becomes as mainstream as organic has now. This company is promising a lot; transparency, sustainability and simplicity and I am buying it big time so please don't let me down! I can't wait to try more of their products in the future (hint hint Rainbow Foods!).

Wednesday, June 13, 2012

Food Network Monthly Cookalong: If I had an ice cream truck

If I had an ice cream truck, I would have the best ice cream you ever saw and everyone would want some! At least that's the dream right?! There would be sugar cones and sprinkles and Dandies and lots of sauces. Sundaes, banana splits and of course a cherry on top! Even one of those old school horns that plays little songs and a bell to ding so all the kids in the neighbourhood would know we were coming.

I asked Mac what he thought we would call it and he said "Ice Cream Truck". He's from the keep it simple school of thought. Can't go wrong though...it's straight to the point and no one would walk up and ask what we were selling. I was dreaming about it and came up with what would be my signature flavour. The one that would keep them coming back for more. I was even smart enough to keep track of what I was doing and wrote it down so I could share the recipe!

So here it is...Ice Cream Truck's signature flavour...Drumstick Sugar Cone!


Trying to take a picture of ice cream is no easy task! I have a even bigger amount of admiration for Hannah Kaminisky and her upcoming ice cream book now for sure.

Drumstick Sugar Cone Ice Cream

Sugar Cone Milk (totally inspired by Momofuku Milk Bar's Cereal Milk)
8 sugar cones
3 cups soy milk (I used Original which is sweetened)
2 tbsp coconut sugar
2 tbsp brown sugar
pinch of salt

Ice Cream Base
2 cups Sugar Cone Milk
8oz silken tofu (not the boxed stuff, just organic silken tofu that would be in the fridge at the health food store)
1/2 cup icing sugar
3/4 cup turbinado sugar
1/2 cup oil (I used grapeseed but you can use any light tasting vegetable oil you like, sunflower, safflower)
1 tbsp barley malt syrup
1/2 tsp custard powder (I use Go Bio brand)
1 tsp vanilla extract
1/8 tsp maple extract


Your favourite caramel sauce (I used a test recipe so I can't share but I know there are lots of good ones out there)

Chopped Peanuts
Chocolate Covered Sugar Cone Pieces (I painted melted chocolate on and inside two sugar cones, popped them in the freezer for 5 minutes, then used a butter knife and sheer will power to crack them into pieces)

1. Make the sugar cone milk: Break up 8 sugar cones into a large bowl, cover with 3 cups of soy milk and let stand for 10 minutes. After 10 minutes, pour the soymilk and cones into a strainer (with another bowl under it). Gently push the cones to release all the milk but don't push so hard that the cones start to smoosh through the strainer. Add the sugars and salt to the strained milk and put in a covered container. Put it in the fridge overnight to let the flavours meld. Also, I found after soaking and straining, I lost a cup of the soymilk just so you know that this recipe makes what you need for the ice cream base.

2. Make the ice cream base: The next day, place all the ice cream base ingredients into a blender and blend it on high for a minute or two. You want to get it all creamy and thick. Chill and then process in your ice cream maker according to manufacturer's instructions.

3. While the ice cream is churning, get all the add ins ready so you can stir them in right before you put the ice cream in the freezer. I stirred the peanuts and chocolate covered sugar cone pieces in the machine and put in ribbons of caramel sauce as I was putting it in the storage container. You don't want to stir it into the ice cream. Let the ice cream sit in the freezer for awhile (I know it will be hard to walk away) to let it set up. Serve on a sugar cone for extra sugar cone goodness!


Monday, June 11, 2012

Food Network Monthly Cookalong: My Tribute to Native Bowl

After I did my last post on Seabirds Truck, I started thinking about all the other vegan food trucks out there. There are so many talented people out there creating delicious vegan food everyday and I routinely torture myself by looking at pictures and menus. I dream of what I would order and what it would taste like and when Ottawa will finally have a vegan food truck. One truck I would love to visit is Native Bowl in Portland, OR. Jay and Julie Hasson are the owners and chefs there and I think I would honestly be a little starstruck. I am absolutely smitten with Julie's book Vegan Diner and the pizzas I have been testing recently are her genius creations! I know that any bowl this vegan power couple makes would be extraordinary and the cart itself is just so charming, I would never want to leave. I looked over the menu and then I emailed Julie to ask her for some inside info on these bowls since I have never had the pleasure of actually eating one. I wanted to know the structure of them, the what goes where. And you know the best part...she quickly answered me with all the info I needed to make one. She even shared a little tip, most of what you need to make a Mississippi Bowl is in Vegan Diner!!! I can't share the recipes with you here but I can tell you which ones I used and if you don't already own a copy this would be the perfect reason to go and get it!

You have to start with a base of jasmine rice. It had been awhile since I had made jasmine rice and once I did, I was a little mad at myself for having denied myself of it for so long. It creates the most amazing aroma while it cooks and has such an amazing, slightly nutty taste. Next is a little ranch dressing* followed by some soy curls slathered in Rough Rider BBQ Sauce* with a few squirts of North Caroline Style BBQ Sauce* (which is my new favourite thing! I put it on everything!). For the soy curls, I rehydrated them in hot water, squeezed out all the water once they were, tossed them with some garlic and onion powder, dried thyme, paprika, oregano, a few cap fulls of tamari then pan fried them with a bit of olive oil until they were browned. Once they were browned, I added in 1/3 cup of the Rough Rider BBQ sauce and let it get warm and caramelized a bit before adding it to my bowl. Now top all that off with some crisp coleslaw* and some sliced green onions and your got yourself a Mississippi Bowl! It is so easy and worth every second! Make sure you stir it up a bit before you eat so you get a bite of everything just like they suggest on the Native Bowl website.

I am seriously in love with the combination of flavours in this dish and will be making it again and again. The crunch of the cabbage, the sweet tang of the BBQ sauces on those curls all mingled with the creamy ranch dressing, it's heaven! It even gave me a reason to break out my silicone take out containers and finally give them their first use. They worked perfectly but I am totally on the lookout for the bowls Julie and Jay use at Native Bowl! I will definitely give the other bowls a go in the future too. I know they would be even better if Julie and Jay were making them but this will definitely do until I make my way to the vegan heartland of Portland!

*denotes recipes that are in Vegan Diner


Monday, June 4, 2012

Food Network Monthly Cookalong: My Tribute to Seabirds Food Truck

Just this past Saturday, the Seabirds Truck posted a picture of some delicious looking Jackfruit Taquitos on their Facebook page. I swooned and wished I was a California Girl so that I could be enjoying the sun and the taquitos. Then I got to thinking...I could make a tribute to the Seabird's taquitos for this month's Food Network Cookalong seeing that the theme fit perfectly! I made a quick trip to the local Asian market, picked up two cans of jackfruit and got to thinking. There wasn't much description of what they tasted like so I had to go with what I thought it would taste like and I think I nailed it! They were crispy and crunchy on the outside and stuffed full of carnita flavoured jackfruit on the the inside. I served mine with a drizzle of Chipotle Avocado Cream from Dreena Burton's newest cookbook Let Them Eat Vegan (with added cumin and extra lime juice) with salsa and guacamole on the side. They would be great with a little vegan sour cream or crema too (Terry Hope Romero's in Viva Vegan is awesome!). I also used the same Chipotle Avocado Cream as a dressing on some thinly sliced red cabbage and carrot and it made an excellent crunchy side dish!

Here's what the finished product looked like...


And here's how to make them!

Jackfruit Carnita Taquitos

2 cans of jackfruit (young green in brine), rinsed
4 cups water
1 large white onion, halved and sliced into half moons
1/4 cup orange juice
1/4 cup lime juice
1 tbsp veggie broth powder
1 tbsp brown sugar
2 tsp garlic powder
2 tsp cumin
2 tsp chili powder
1 tsp salt
1/2 tsp ancho chile powder

Package of corn tortillas
Oil for frying

1. Combine the rinsed jackfruit, water, onion, juices and seasonings in a large stock pot. I use a heavy enameled cast iron one. Bring to a boil and then reduce the heat to keep it at a simmer with the lid on. Simmer for 2-3 hours then remove from the heat, leave the lid on and let sit for another 2-3 hours. You could even let it cool, refrigerate and leave the rest til the next day at this point.

2. Reserving the cooking liquid, remove the jackfruit and onion slices and roughly chop them. Put the pot with the reserved cooking liquid over high heat and simmer until it has reduced down to 1/4 of the original volume. While this is reducing, heat a frying pan with a tablespoon of vegetable oil (I used grapeseed) and pan fry the jackfruit/onion mixture until it is caramelized and brown on the outside. I had to do this in two batches, you might have to too and if you do, add another bit of oil when you put the second batch in to brown. Once all the jackfruit has been browned, place it all back in the frying pan over high heat. Pour the reduced cooking liquid over the jackfruit. It will bubble up and continue to reduce as it coats the jackfruit. Turn off the heat and let cool. If you don't have the time, you can fill them while it's hot, just watch your hands.

3. Start by heating about an 1 1/2 inches of oil (again I used grapeseed) in a cast iron frying pan (mine's 10"). Again I have no clue what temperature unfortunately. I put it over med-high heat until it shimmers and bubbles when you add something to it. While that is heating you will need to warm the tortillas so they don't just crack when you try to roll them. I used the microwave to do this by wrapping them in paper towel (and separating each one with another piece) and microwaving in 30 second intervals until they feel warm and pliable. You can keep them warm in a tortilla warmer if you have one. Take one tortilla in your hand and place a few heaping spoonfuls of the jackfruit on it near the edge. Roll it completely around the jackfruit and place seam side down in the hot oil. Keep an eye on them and turn after a minute or two, checking to see how it is browning underneath, frying on the other side until golden brown all over.

4. Remove and place on a paper towel lined cooling rack to remove some of the excess oil and serve with your favourite salsa, guacamole and crema!